The cloud has made it so easy to host our own websites. On top of that, most cloud providers offer a free tier for 3 months to 12 months. This website is hosted on the Google Cloud and I have tried with AWS before. The steps and procedures are almost same. You could have your wordpress up and running in one hour. Customizing could take some time, though.
Why WordPress?
There are lot of Content Management Systems (CMS) available that are opensource. WordPress is best known for blogging and it has a great community that creates plugins/themes both free and paid. There are other alternatives like Drupal, Ghost and even lighter ones like ‘Grav’ that do not need a database.
GCP & AWS
WordPress requires a WebServer (apache or nginx). It also requires a database (mysql or mariadb). These two are well supported in all OS platforms, of which linux is most cost effective. RedHat distros prefer MariaDB and MySQL works for Debian distros. For small scale blogging, the free tier could fit the hardware requirements. AWS has t3.small which offers 1vcpu, 1GB RAM, 8GB storage. Google has e2-small which gives 1vcpu and 2gb ram, 10GB storage. With Ubuntu 24.04LTS on both AWS and GCP, the RAM was around 600Mb after installing all the required softwares/packages. The cloud shell experience was a breeze in both AWS and GCP. The Virtual Machine (VM) instances are cheaper in the US/Canada regions when compared to Asia Pacific / Singapore regions. While creating the VM, leave the HTTP port 80 open for anywhere. We can turn this off after enabling HTTPS port 443.
WordPress Installation
At a high level, below are the steps to keep your website running
Install webserver, database, php modules via apt-get install
Configure database with admin username/password
Copy wordpress files to webserver path (/var/www/html for apache)
Use website itself to integrate with database and finish installation
Get an elastic/static ip for your VM and map it with your domain (buy from godaddy.com or other providers)
Enable HTTPS
Install plugins to secure your website and for statistics.
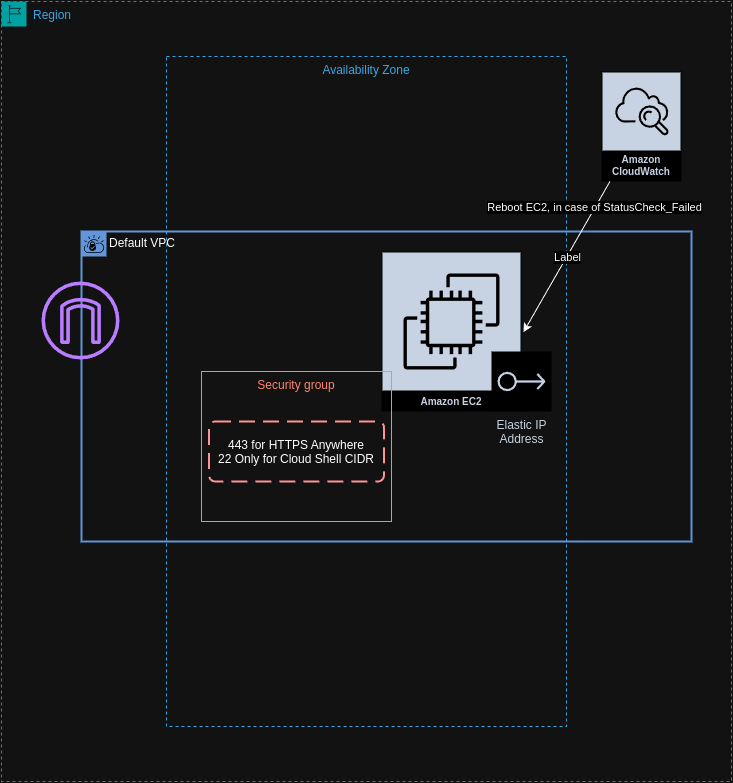
On AWS, the setup looks like below,
Pre-Installation (optional)
If you want to familiarize with the below installation and configuration, you could do that locally on your laptop/desktop. Use Podman Desktop if you are on Windows. On linux, install docker and spin a debian distro container image –> “docker pull ubuntu”. Get into the container and install apache, wordpress etc. If you want to just get a feel of wordpress ui customization, there is a docker image for wordpress also – “docker pull wordpress”. Even quicker would be trying these images on docker playground.
Installation via CloudShell
You can download the SSH key and connect to the remote VMs but it is not recommended in general. The Instance Connect on AWS and CloudShell on GCP, both require port 22 to be open on the VM. The security group in AWS or VPC firewall rules in GCP must be updated to allow the CIDR range of the cloudshell instance. AWS highlights this CIDR range when you try to do Instance Connect via browser. In case of GCP, the CIDR is shown on the prompt after your first attempt to connect gets a timeout. The cloudshell offers passwordless sudo, which is great. The below sudo commands can be given as part of EC2 UserData or GCP’s Startup Scripts
cd /tmp wget https://wordpress.org/latest.tar.gz tar -xvf latest.tar.gz sudo mv wordpress/ /var/www/html/
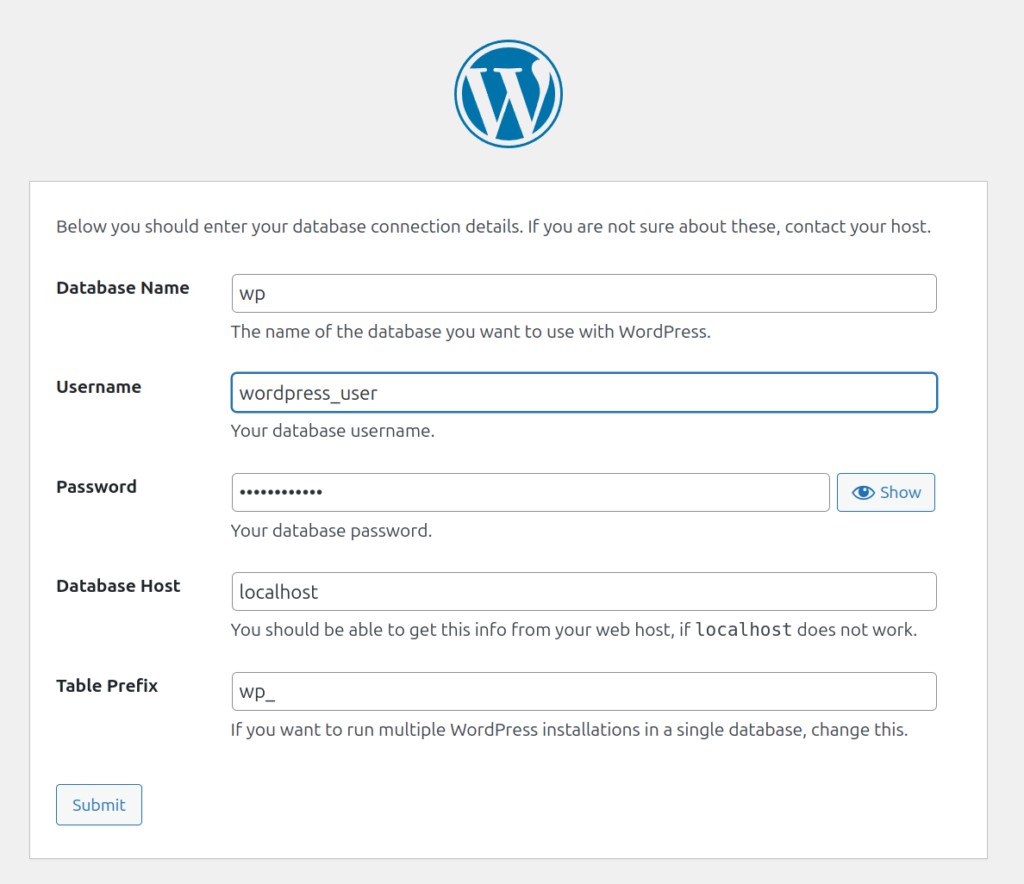
MySQL – This step has to be done first and the UI startup page needs these details
sudo mysql -u root mysql> ALTER USER ‘root’@localhost IDENTIFIED WITH mysql_native_password BY ‘YOUR_STRONG_ROOT_PASSWORD’; mysql> CREATE USER ‘wp_user’@localhost IDENTIFIED BY ‘YOUR_STRONG_USER_PASSWORD’; mysql> CREATE DATABASE wp; mysql> GRANT ALL PRIVILEGES on wp.* TO ‘wp_user’@localhost; exit
On browser, hit the public http url –> http://mynewdomain.in/wordpress After filling the first setup screen and clicking Submit, wordpress generates a PHP file (wp-config.php) that has to be manually saved to the file system
copy the contents from the UI screen cd /var/www/html/wordpress sudo nano wp-config.php paste the contents
Hit Ctrl+O to write to file Hit Enter to accept the filename Hit Ctrl+X to exit nano editor – Restart apache (sudo systemctl restart apache)
Go back to browser and Click “Run Installation”
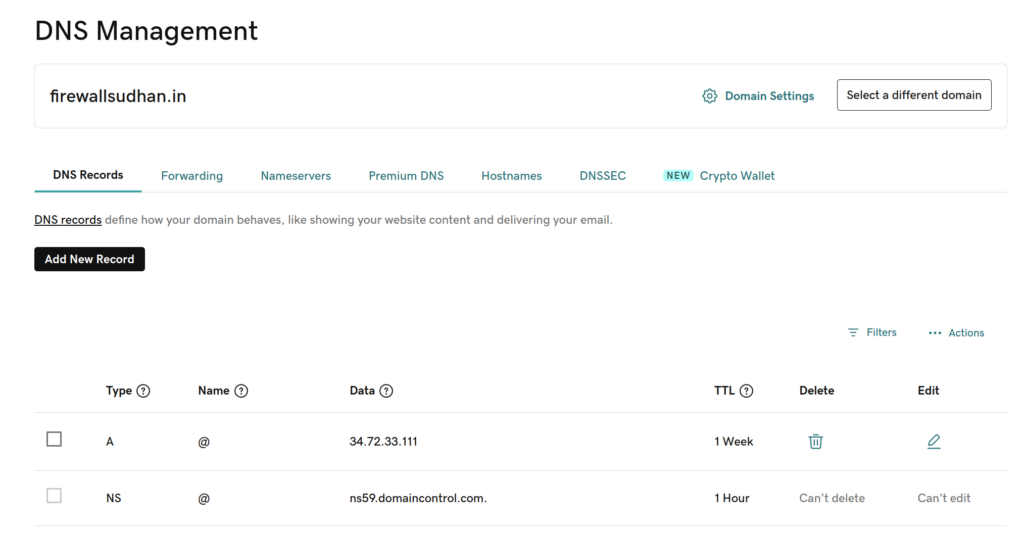
Before winding up further configurations, it would be good to login to your DNS provider and update the public elastic/static ip address for your domain. The DNS update/refresh would take 5+ minutes and at times this could be hours also. Example: Login to GoDaddy.com Click on Manage DNS Add a ‘A’ record with name @ Keep the TTL to 60 seconds and this can be changed to a higher value later.
Update WordPress Configuration
// Make wordpress directory as default for apache: cd /etc/apache2/sites-available/ sudo nano 000-default.conf Update the DocumentRoot to /var/www/html/wordpress (from /var/www/html)
// Update Site URL in UI – http://mynewdomainname.in/wp-admin Goto Dashboard –> Settings –> General Settings Update the domain name in WordPress Address URL and Site Address URL –> mynewdomainname.in
Make WordPress owner for its folders. The default wordpress user is www-data. This will ease plugin installation cd /var/www/html sudo chown -R www-data:www-data /var/www/html/wordpress/ sudo find /var/www/html/wordpress/ -type d -exec chmod 755 {} \; sudo find /var/www/html/wordpress/ -type f -exec chmod 644 {} \;
Installing HTTPS – With certbot, we can generate the required SSL Certificate and it is free,quick and easy.
sudo certbot –apache Enter Email Enter Y and N Enter to accept all domains
Securing wp-admin:
Enable Multi Factor Authentication (MFA) for wp-admin login Install Wordfence plugin via UI. Register and get your free license. Apply the license and setup Google/Microsoft Authenticator or any other app of your choice.
Once done, remove the inbound access via port 80 and install cloud agents for basic metrics on cloud dashboards. This will be quick and can be done via the Console itself.